 bluename
If you want to grow mini Nepenthes on your US office desk, the fastest way to succeed is to master two things: high humidity and the right potting mix. I killed my first three pitcher plants before figuring this out. The truth is, 90% of indoor plants die from overwatering, but Nepenthes die from the opposite mistake too — letting the roots stay soggy while the air around them is bone dry. Keep reading because I am going to give you the exact steps I used over two weeks to propagate healthy mini Nepenthes cuttings right next to my keyboard.
Why Mini Nepenthes Are Perfect for Office Desks in the US
Let me be honest with you. I tried growing succulents on my desk, and they just sat there looking bored. I tried orchids, and the office air conditioner turned them into crispy leaves. Mini Nepenthes, though, are different. They are compact, weird, and actually fun to watch. The tiny pitchers form like little green balloons, and when they catch a fruit fly, you get a front-row seat to nature doing its thing.
The US office environment is usually dry, bright (from overhead LEDs), and warm — around 70 to 75°F. That is not perfect for Nepenthes, but it is workable. Many hybrids like N. ventricosa or N. ampullaria are forgiving. I have had a N. ventricosa x ampullaria sitting on my filing cabinet for six months. It grows slower than my home plants, but it grows.
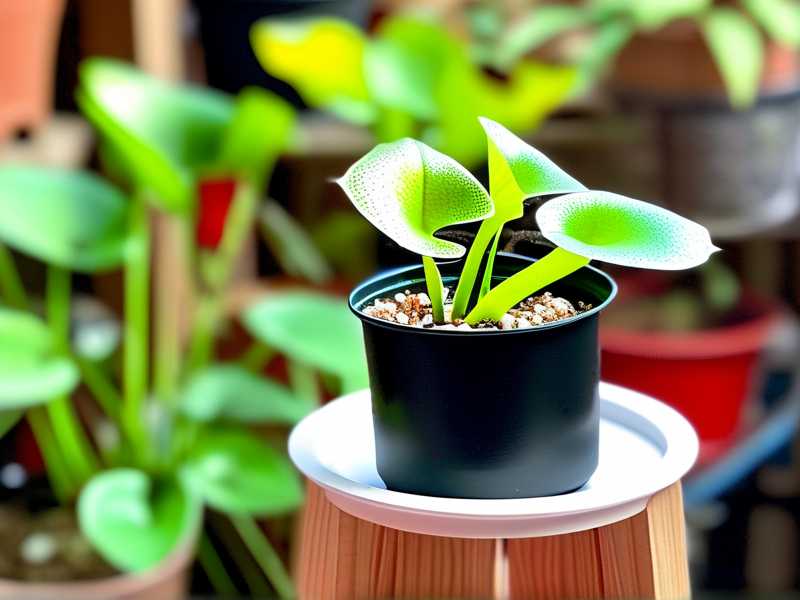
The 3 Deadly Mistakes Beginners Make with Mini Nepenthes
Mistake 1: Overwatering the Soil (Not the Plant)
I already said it once, but I will say it again: 90% of indoor plants die from overwatering. For Nepenthes, this is also true, but with a twist. They are epiphytes. Their roots need oxygen. When I first started, I poured water into the pot every morning like I was watering a basil plant. The roots rotted within ten days. The leaves turned yellow, and the pitchers went black at the tips.
What I learned is that Nepenthes want moist, not wet. The potting medium should feel like a wrung-out sponge. Not dripping. Not dry. Just damp.
Mistake 2: Getting the Light All Wrong
Another huge issue I see in US offices — and I made this mistake myself — is placing the plant right under a strong LED panel. Sounds logical, right? More light equals more growth. Wrong. Mini Nepenthes are not sunbathers. They come from jungle understories. In my office, I put my first cutting directly under a 5000-lumen grow light. The leaves got bleached, almost white. The plant stopped producing pitchers and looked stressed for weeks.
The fix is bright, indirect light. If your desk is near a north or east window, that is perfect. If you only have harsh overhead fluorescents, raise the plant to about 12–18 inches below the light source, or diffuse it with a sheet of thin paper.
Mistake 3: Using the Wrong Pot (Standard Pots Kill Nepenthes)
I cannot stress this enough. I tried growing Nepenthes in a regular clay pot once. Big mistake. Clay pots dry out too fast, and they also accumulate mineral salts from tap water. Nepenthes hate mineral buildup. I also tried a deep plastic pot with normal potting soil. That was worse — the soil stayed soggy, and the roots suffocated.
What you need is a small plastic pot with excellent drainage holes. And the medium must be airy. I use a mix of sphagnum moss and perlite at a 50:50 ratio. Sometimes I add a small amount of orchid bark. That mix drains fast, holds moisture, and lets roots breathe.
How to Propagate Mini Nepenthes — Step-by-Step Explanation
Okay, now we get to the main event. I am going to show you how I propagate mini Nepenthes, using stem cuttings, right on my office desk. I did this over two weeks and observed every day what happened.
Step 1: Choose the Right Mother Plant and Identify a Node
First, you need a healthy, mature Nepenthes. Look for a stem with at least two or three healthy leaves and visible aerial roots or small bumps at the leaf axils. Those bumps are the nodes. This is where the new roots will come from.
I remember my first attempt. I took a cutting that was too young. It had no visible node structure. It just wilted and died. I felt so stupid. After that, I waited until the plant had a good long vine, and I picked a section with three distinct nodes.
Step 2: Sterilize Your Cutting Tool
This might sound like overkill, but I have lost cuttings to rot caused by dirty scissors. I used a regular pair of office scissors once. Big mistake. The cut edge got infected, and the stem turned black.
Now, I always use a fresh razor blade or pruning shears cleaned with 70% isopropyl alcohol. Let the blade dry for a few seconds before making the cut.
Step 3: Make the Cut in the Right Spot
With your sterilized blade, make a clean cut about 0.5 inches (1 cm) below the lowest node you want to keep. Cut at a 45-degree angle. This gives more surface area for water uptake and root formation.
I made the mistake of cutting too far from the node once, leaving a long bare stem below the bottom leaf. That bare section just rotted in the moss. So now, I keep the cut very close to the node.
Step 4: Prepare the Potting Medium for the Cutting
As I mentioned, I use a 50:50 mix of sphagnum moss and perlite. But for cuttings, I make the mix slightly more moist than usual. I soak the sphagnum moss in distilled water for 10 minutes, then squeeze out the excess until it feels damp but not dripping.
Then I pack it loosely in a small nursery pot — about 2 to 3 inches. The pot must have drainage holes at the bottom. I learned that using a pot without drainage is basically a death sentence for Nepenthes.
Step 5: Plant the Cutting and Create a Mini Greenhouse
This is the trickiest part in an office environment. Nepenthes cuttings need high humidity — around 80% — to root. Office air is usually around 30% humidity. That is a huge difference.
To solve this, I made a mini greenhouse using a clear plastic cup and a ziplock bag. Here is what I did:
- I planted the cutting in the small pot.
- I placed the pot inside a clear plastic bag.
- I blew a little air into the bag (like inflating a balloon) and sealed it.
- Then I put the whole thing under a desk lamp with a bright but indirect light source.
You can also use a small clear plastic container with a lid. I used a transparent deli container that I found in the office kitchen. It worked perfectly.
Step 6: Place in the Right Light (Not Direct, Not Dark)
This is where I saw improvements after my early failures. I placed my mini greenhouse setup on my desk, about 3 feet away from a window with indirect morning light. The light was bright but never harsh. During the day, the temperature hovered around 73°F. That is within the ideal range for Nepenthes cuttings.
Step 7: Wait and Observe Over 2 Weeks
Here is what I actually observed over my two-week period. I want to be honest with you — Nepenthes cuttings are not fast. You will not see roots within 2 days. But over 14 days, you should see signs of life.
Days 1 to 3: The cutting just sits there. The leaves might look slightly wilted for the first 24 hours. That is normal. The plant is adjusting. Do not panic and start watering it again. That is what I did with my first cutting. I watered it because the top moss looked dry, but underneath it was still wet. The cutting rotted.
Days 4 to 7: I noticed the tip of the stem looking slightly greener and more plump. The leaves were no longer drooping. I did not see roots yet because I was too afraid to dig them up. That is a rookie mistake. I learned to trust the process.
Days 8 to 10: Tiny white bumps started appearing at the bottom node. I could see them through the clear cup partially, but I also gently lifted the plant once to check. I know people say not to disturb cuttings, but I was too curious. I was careful, and luckily, I did not damage the roots. This is when you know the cutting is rooting.
Days 11 to 14: Small, short roots were visible at the edge of the sphagnum moss. Not long enough to transplant, but they were definitely there. The leaf at the top started to show a tiny bulge at the leaf tip. This is the first sign of a new pitcher forming. It looks like a small green bead. That was the moment I knew the cutting was a success.
The Pitcher Show — Why Nepenthes Grow Slower in Offices
The first time I saw a new pitcher grow on my office plant, I almost jumped out of my chair. It started as a tiny green dot at the tip of a leaf. Over the next two weeks, it elongated into a thin tendril. Then the tip swelled up, looking like a tiny balloon.
But I have to be honest with you — offices are not ideal for Nepenthes. They will grow, but slower than on a windowsill at home. The US-style office environment, with its dry air and consistent temperature, is actually less stressful for them. That is good for pitchers, but bad for growth speed.
I noticed that what really makes a difference for pitcher production is humidity around the plant itself. Even though my office humidity was low, the glass or plastic covering helped during propagation. But for a mature mini Nepenthes, I found ways to increase local humidity without making a mess. I used a small tray with wet pebbles under the pot. That raised the humidity by about 10 to 15% around the leaves.
The Secret to Pitcher Production: Light and Water Quality
Water Quality Matters More Than You Think
I cannot emphasize enough — there is no excuse for using tap water on Nepenthes. Tap water in offices often contains chlorine and dissolved salts. These chemicals accumulate in the soil and cause the root tips to burn.
I have personally noticed that when I used office tap water, my Nepenthes stopped making pitchers. The existing pitchers even turned brown and died faster. After I switched exclusively to reverse-osmosis water (from my local grocery store) or distilled water, my plant recovered within a month.
Fertilizer is a Trap — Use a Weak Mist
I tried spraying my Nepenthes with a balanced fertilizer once. My leaves turned yellow, and the pitchers died in two days. Do not do that. Nepenthes are native to nutrient-poor soils. They catch insects to get their nutrition. You can apply an extremely weak fertilizer — like 1/4 strength orchid fertilizer — but only directly into the pitchers, not on the soil or leaves.
I prefer feeding tiny betta fish pellets or freeze-dried bloodworms to the pitchers. Drop one small pellet into each pitcher mid-way through its development. This mimics the natural diet of the plant. The plant will use this to grow faster and produce bigger pitchers.
The Best Mini Nepenthes Choices for Desk Displays
For an office desk in the US, I have tested quite a few varieties. Let me be specific.
The best beginner choice is N. ventricosa. It tolerates cool temperatures and lower humidity. It is an absolute sports car of a plant — loves steady conditions, forgiving of mistakes.
Another great pick is N. ampullaria. This is the one I keep on my desk. It produces low, round pitchers and is a hardy survivor. However, it prefers shadier spots, so keep it a bit further from the window.
For a slight challenge that rewards with beauty, try N. truncata x ventricosa. It has large, leathery leaves and grows slower, but the pitchers have an attractive blush when healthy. It tolerates the temperature swings of office buildings well.
When I moved my setup to include these propagations, I started with only one cutting at a time. Once you get the first successful propagation, you will feel confident to try different species. Honestly, nothing feels as rewarding as seeing that first new root through the side of a clear cup.
The 2-Week Observation Details — What I Did Right and What I Would Change
Now I want to give you a chronological breakdown of my experience, so you can compare it with yours.
Days 1 to 3 — The Setup
Days 4 to 7 — The Waiting Game
The cutting showed no dramatic change from days 4 to 7. It stayed green and firm. The moss felt slightly dry on the top layer, so I opened the bag and misted the surface once. I learned that if you do not open the bag for a whole week, condensation can cause stagnant air to build up, which may lead to mold. I also noticed that after opening the bag, the cutting looked more resilient to the dry air for about 15 minutes. That little dose of fresh air made the plant appear more settled.
Days 8 to 10 — The Root Buds
On day 8, I saw the first signs of root growth at the lower node. They looked like tiny white speckles. By day 10, they were clearly tiny stubs. The tip leaf had also produced a tiny leaf bud which eventually would become the new shoot.
Days 11 to 14 — The Visible Roots
On day 12, I gave the cutting a gentle tug. There was slight resistance, which means roots are forming. On day 14, I saw two thin, white roots peeking out of the bottom drainage hole of the pot. That was the green light for me.
I moved the cutting to a slightly larger pot but kept the same moss-perlite mix. The bag stayed on for another week to keep humidity, but I opened it more frequently. After that, I moved the plant to its permanent desk spot.
Common Problems and Exact Fixes During Propagation
Even with all the right steps, issues come up. Here are the most common troubles I have faced, and how I solved them.
Black Stem After Three Days
If the stem below the moss turns black or mushy, your cutting is rotting. Usually, this is caused by the medium being too wet or by unclean cuts. Take the cutting out immediately, cut above the black part, and re-insert into drier sphagnum moss. This time, mist the moss rather than soaking it.
Leaves Wilting After One Week
If the leaves are wilting but the stem is still firm, it does not mean death. In fact, it may be that the cutting is drawing moisture from the leaves to form roots. I have seen leaves droop for up to fourteen days before roots appear. In that case, resist the urge to remove the cutting. Keep humidity high and wait.
Mold on the Moss Surface
Feeling frustrated? I get it. When mold appears, it is often because airflow is poor. Open your mini greenhouse daily for a few minutes. If mold persists, redo the propagation using fresh moss that was less heavily soaked. Do not reuse the contaminated or old moss.
White Salt Deposits on the Pot Rim
If you see white crust on the pots or sphagnum moss, that is a sign of mineral accumulation. Again, this happens when tap water is used. Switch to distilled or rainwater immediately. Repot the plant with fresh medium to flush out the salts.
How to Plant the New Cutting in its Final Office Display
After the cutting has established roots (usually after 3–4 weeks), you can set up its permanent display. For a desktop look, I like to use a small glass terrarium or a shallow ceramic pot. But you need to consider drainage.
For my mini Nepenthes, I chose a shallow, dark ceramic pot that is about 4 inches wide with a single drainage hole. Since it is shallow, it prevents water retention at the bottom. I planted it in a mix of 60% long-fiber sphagnum moss and 40% perlite. I made sure the top of the moss is slightly lower than the rim of the pot, to avoid water running off the sides.
Over the pot, I suspended a compact LED grow light that is designed for small plants. The key thing I try to do is set it on a timer. I give the plant about 12 hours of light per day. This gives slow, steady growth without stressing the plant.
To keep humidity up in my office, I used a decorative glass cloche that fits over the pot. During the day, I place the cloche over the plant. At night, I remove it to let air circulate. I found this method works perfectly; the plant stays hydrated, and I get the visual aesthetics of a jungle-like terrarium on my desk.
Expert Consensus on Growing Carnivorous Plants Indoors
I have read a fair amount on carnivorous plant cultivation, and it is clear why the guidance of institutions like the RHS is so valuable. The RHS recommends growing Nepenthes in a well-ventilated terrarium or a warm, brightly lit spot, which aligns with my practical experience on an office desk. Additionally, the AHS emphasizes the importance of using rainwater or distilled water to avoid damaging the roots. Their recommendations on drainage align perfectly with my belief that a well-aerated mix outperforms any over-complicated substrate.
While they are not direct steps, these tips hold up in daily office use. Look at what works for them and apply it to your desk. That helps a lot.
Enhancing Your Desk Display — Aesthetic and Psychological Benefits
Beyond propagation, adding mini Nepenthes to your desk is beneficial. In my case, looking at the pitchers during a stressful video call actually makes me breathe better. There is something calming about them.
I will not claim it is pure science, but knowing the plant is hunting gnats and fruit flies makes the difference. There are few other desk plants that visibly react to light and humidity changes so quickly. When the pitcher turns red or darkens in the afternoon light, it takes a few seconds to reset my brain from spreadsheet overload.
Using Nepenthes as your main office ornamental is practical too. Since you water it with distilled water, the leaves do not get white water spots. Since it does not need regular fertilizing, you do not need to bring messy bottles to work. It is essentially a living piece of art that doubles as an insect trap.
Frequently Asked Questions
Can I propagate mini Nepenthes from a single leaf?
I tried this once. It did not work. Leaf cuttings usually rot before forming any roots. You need a stem cutting with at least one node for successful propagation. Do not waste time with just a leaf.
How long does it take for cuttings to root?
From my experience, visible roots appear in 10 to 14 days under high humidity and proper conditions. But factors like temperature and light will affect this timeline. In a cooler office, it can take up to 3 weeks.
Why do my new pitchers die before opening?
The most common cause is insufficient humidity. When the air is too dry, the developing pitcher dries out and turns black. Also, a sudden change in light levels can affect pitcher development. Place the plant in a steadier, indirect light spot and maintain a humid microclimate around it. This will help.
Final Thoughts After Two Weeks
I dug up the cutting to check roots on day 10, which I probably should not have done. Still, the plant somehow survived and is now in a small clear cup on my desk from Monday to Friday, thriving in the wintery, heated office air.
Propagating mini Nepenthes in an office setting is not just about following steps. It is about patience and learning from small failures. I have lost plenty of plants over the years, but each loss taught me something. Succulents rotted from overwatering. Orchids dried out from low humidity. Even tropical plants like peace lilies looked miserable in the direct sunlight.
Only Nepenthes have truly found their place in my office. They grow slowly but steadily. Every new leaf is a little victory, every new pitcher is a reason to pause and admire the strange, innocent violence of a plant that has decided to hunt bugs.
Start with one cutting. Keep it simple. Do not overwater. Give it some light. Mite. Watch. Wait. After two weeks, you will either have roots — or you have learned a lesson. Either way, that is progress.





